Un triplé légendaire: Le sud, le soleil, la plage, les palmiers (6c+) at Aguilles Dorées
On our third day of climbing after great days in Face au large (7a) & Et je suis le vent (6c) we were eager to get on Le sud, le soleil, la plage, les palmiers which scales the prominent capucin des dorées. So much in advance - the route is not an easy day on the beach as the name might suggest! Interestingly, it was established in the same year and by the same people as Face au large but we found it quite a tad more challenging. However, aspirants will be rewarded with an indeed exceptional series of cracks just like the guidebook promises!
We reached the base at 8:00 while the sun had not quite arrived. The actual starting point will very much depend on the height of the snow cover. For us, it was very low and yet it took a bit of effort to negotiate a few meters in steep and hard snow in approach shoes.
We chose the left starting variant, because it allows to get everything ready on a big rock ledge. The right variant seemed nice, too, but probably requires a series of big cams.
L1 5c
Really short pitch, few meters along a juggy vertical splitter, then traversing along a big flake to the belay which you could already see from the starting ledge.
L2 6b+
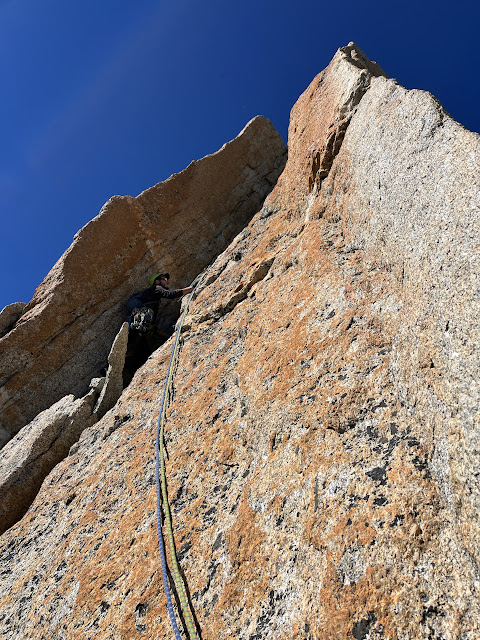
This pitch got us kickstarted with steep thin finger cracks & delicate feet before it leans back and follows an amazing leaning splitter crack (#0.5-#1). A tricky slab section (well protected by 2 bolts) requires careful examination of the rock to find a few tiny features that allow you to pass. By the end, this pitch stretched our 50m rope quite a bit.
L3 6b+
Great outlook on a perfect crack corner. The route attacks the crack in a direct line through the moderate slab (well protected, 2 bolts), however we found out later during the rappel that the crack actually continues all the way to the ground - so we recommend any crack lover to descend a few steps to the right on the ledge to extend the splitter glory!
The crack jams well (#1-#2) just the exit is a bit tricky where the good jams retreat deeper into the crack making it harder to move. On the top just keep going straight, a few acceptable placements allow to protect this easier section.
The crack jams well (#1-#2) just the exit is a bit tricky where the good jams retreat deeper into the crack making it harder to move. On the top just keep going straight, a few acceptable placements allow to protect this easier section.
L4 6c+
It's easy to spot the bolts from the belay which indicate the bold way through the red face. The beginning is still easy in blocked terrain, but the transition onto the slab at the first bolt already requires more engagement. From this point on it's a long way to the top...always on tiny crystals the path of least resistance meanders through the increasingly steeper slab culminating in a face crux at the last bolt. At this point you reach the lower end of a crack seam and I puzzled a long time how to get into it properly and eventually took the wrong bet...too bad! I could pass on my second try, but it's by far not over yet. Now climbing on gear again you still need to bring on a series of technical jams & layback moves to prevail. I reached the belay quite exhausted - what a sustained pitch! The lack of rest points keeps you under tension for quite a long time!
L5 6b
The route passes a short face along some shallow cracks and almost pocket-like structures and while it's not as sustained as the previous pitch, I thought the crux was quite beefy! As it resembles more face climbing you will find two well placed bolts here. The second half is easier in slanted terrain and yet three bolts help you find the way. From the belay you already get a very good impression of the pillar!
L6 5b
In this transition pitch finding the path is probably the biggest challenge. Aim for about 1 o'clock (slight right) where you see a small corner with some moss. In contrast to the topo, we encountered at least two bolts in the following slab probably added to allow passage in the better part of the rock.
Big choss ledge (~80m)
We simply walked up, after 50m you can belay on gear at a small rock step and cover the remaining 30m from there. It is quite easy to spot the belay at the base of the pillar. We skipped the 5b variant.
L7 6b
Due to the lack of bolts and the absence of an obvious line we could not quite make up our mind where to go. The topo is a bit rough here and only indicates that you come through a roof, but nowhere could we see an obvious roof! In fact, just keep right and attack the arete of the pillar where you find a structured system of cracks, corners and little chimneys.
Well, in the meantime we had spotted some roof that we thought could match the topo. However, while the direct line through the face seemed to feature some cracks for protection it did not look entirely convincing. So I ventured left in easier terrain, but only to reach the end of the rope inconclusively. So I downclimbed a bit and reaffirmed by Max approached "the roof". My intuition kept telling me that there should be a bolt (if the line went through here), but I kept finding placements and structure that made it plausible that maybe it was really just clean. So I managed to pass the roof (~6b) just to face a big void (i.e. no belay in sight). At least I could establish a good belay on gear and avoid more unconventional manouvers.
L8 6b
Fortunately, the fact that you can climb virtually anywhere also meant that we could proceed from our provisional belay. 30m later I managed to meet the big flake that the topo warns about and shortly after the two crux bolts at the arete. Despite increasing rope drag and running low on gear I managed the crux on some shallow cracks & pinches quite comfortably. Finally we were back on track, quite an adventure! In any case, the view drops all the way to the base - amazing!
L9 5c
This pitch gets you to the base of the final head wall and even though it's quite moderate I could tell that the last two days and the previous pitches had definitely taken their toll - how would that play out on the significantly harder crux pitch ahead of us!?
L10 6c+
Wow! We are looking up a big, steep face and in contrast to earlier there is no doubt about the line: an obvious finger crack splits the face and higher up it transitions into a separate wider crack to the left. Besides two bolts the entire pitch goes clean. One protects a few athletic face moves at the start and one protects a wide crack at the end (fist to arm bar). I engage hoping for the best. In the lower part the seam gets quite thin at times, but intermediate pods allow for rest. The crux is to transition to the crack on the left - the hand sequence needs a bit of consideration since matching locked fingers turns out quite tedious. On top of that I had seemingly run out of properly sized gear, fortunately I found a different spot for the cams that I had left. From this point on the crack keeps getting wider and easier.
Wow! We are looking up a big, steep face and in contrast to earlier there is no doubt about the line: an obvious finger crack splits the face and higher up it transitions into a separate wider crack to the left. Besides two bolts the entire pitch goes clean. One protects a few athletic face moves at the start and one protects a wide crack at the end (fist to arm bar). I engage hoping for the best. In the lower part the seam gets quite thin at times, but intermediate pods allow for rest. The crux is to transition to the crack on the left - the hand sequence needs a bit of consideration since matching locked fingers turns out quite tedious. On top of that I had seemingly run out of properly sized gear, fortunately I found a different spot for the cams that I had left. From this point on the crack keeps getting wider and easier.
L11 6a+
The summit pitch finishes with a series of stimulating corner moves which are protected by 2-3 bolts which are more than indicated by the topo. We arrive at 16:30 ca. 8h after we started climbing. Since the top doesn't provide much space and we still need to cover the descent, we only shortly enjoy the view.
We rappel the route only linking L11+L10 with 50m. L8 is a real rope eater, it's very likely your ropes will get stuck, too (at the height of the big flake) We had to climb this part up and down again. Afterwards everything goes smoothly, only in L3 the rope got almost stuck in the crack.
Almost 2 hours later, at 18:40 we touch base again.
Our trip to the beach turned out to be the most challenging, but also the most rewarding climb in our triplé. That is not to say any of the other climbs were of lower quality - they are all great in their own way. In any case, we agreed our next stop would be the actual beach of Champex-Lac. 'Le sud,...' is clearly a must-do for those who enjoy trad climbing on proper cracks but it also offers a few face climbing challenges. Protection is very good in compact sections, and the cracks are easily protected with 2 racks of micro to #1 and one of #2 and #3. The view is amazing even though the big ledge separates the pillar from the base, but actually it should be considered a welcome opportunity for a break in this train of otherwise sustained pitches.
 |
| What a pillar! View on the capucin des dorées from the start of L6 (5b). |
 |
| Back on track with a stunning view in L8 (6b) |
 |
| L10 (6c+) looks less intimidating from the top than from the bottom, but it's still impressive! |
 |
| Summit pitch corner L11 (6a+) |
 |
| Max coming down from the belay of L1 (5c). We had started about 10m to the left. |
 |
| Venturing into the unknown: establishing a variant to the ominous 'roof' pitch L7 (6b). The actual line is ca. 6m to the right. |
 |
| Resting in L5 (6b). |
 |
| Approaching the splitter corner in L3 (6b+) |
 |
| Splitter glory in L2 (6b+). |
 |
| Crux pitch L4 (6c+) of 'Le sud,...' There is no stopping from the position of the climber to the end of the crack on the horizon 🥵. |


Kommentare
Kommentar veröffentlichen