Parete Sud - Lady of Dream (7a)
Two months ago, during Easter weekend, we had already taken a shot at Lady of Dream. Unfortunately, back then I took a rib-cracking back-flip-whipper in the crux of pitch four, and we had to retreat prematurely. Having recovered, I was eager to return, and settle the score! Clearly, I was not in peak physical shape, but the Lady's foremost requirement is technique anyway. Besides, I could count on my strong partner Dave to maintain our momentum all the way to the top!
 |
| Approaching the second crux of pitch 5 (6c+). You can also scrutinize the first crux in the bottom left corner of the picture. |
The weather forecast had indicated some rain towards the evening, so we got up early, and left at 6 am from Mosogno. In any case, the hike is nicer in the cool morning air. As I knew the way, we took only 1 hour to reach the base, even though the ferns were about knee to hip height already.
After following the yellow marks up to Piano, the traditional approach passes the huts to the right, and ascends the grassy-ferny blocks behind. However, during our descend we discovered a freshly marked path, which actually takes a hard left at the huts (from the ascending perspective). From here, take some rock stairs, and go into the forrest, following red marks. The path ascends in a straight line, with one switchback to finally arrive at an old stone ruin.
Beware of ticks, those little buggers are quite numerous!
 |
| Early morning atmosphere during the approach. |
L1 7a* (crux 2nd try)
We had agreed to take swinging leads, and I got to start, as I knew the first pitch already from last time. From first to second bolt, shifting your weight onto a slopey rail will already test your no-hands-it's-all-in-the-feet skills. The actual crux waits at the fourth bolt, after a nice section of spreading. One part is to get out of the spread position (leave some space with the right foot for a foot switch), and then perform a difficult right hand-foot match (assisted by the left hand in a tiny pocket). Afterwards, a few more cool slab boulders guard the way to the belay, but all significantly easier than the crux. *Grades from the 2021 SAC Ticino Guide.
 |
| Spreading just before the crux of the first pitch (7a). |
L2 6c (not free)
While the first bolt is gained with a moderate loop to the left, the second bolt already requires an insecure clip from a position that is only supported by the friction between your soles, and the blank slab. The crux follows at/after the third bolt...while the face looks pretty much the same (blank), the smears are ever so slightly worse, making it almost impossible to progress. At least, the crux section can be aided (it is actually quite short, maybe three or four foot moves), but not so much the following meters, which require obligatory 6b/+ moves to gain the next bolt. This pitch perfectly illustrates the sometimes binary character of pure friction slabs: they are either physically possible - or not. At this point, subtle factors come into play: temperature, moisture, rubber composition, shoe sizing, dragging along a tag line...
 |
| The (im)possible slab in pitch 2 (6c). Friction as can be! |
L3 6b+ (crux 2nd try)
An exciting, but moderate dyno to a good hold opens this round, followed by a sequence on artful rock that looks easier than it is. Afterwards a small lip needs some investigation, but once you find the undercling, it's done. A shallow arete leads into the crux slab just before the belay. After an insecure clip, the toughest part is not to rush, but take the time to place and weight the smears nicely.
 |
| Where are the holds in the crux of pitch 3 (6b+)?? |
L4 6c+ (onsight)
I was not entirely disappointed that I did not get to lead this pitch again, but in any case I would have pre-clipped the bolt where I had taken the nasty whipper last time (Dave also took this advice to heart, second bolt after second lip). But before you get there, you need to cover a clean, but juggy section (cams 0.75-1?) to the first bolt, after which a tricky mantle could already throw you off. The slab crux waits after the second lip, and this time I managed first try, but again only with a small margin. In contrast to the previous slabs, there are actually some knobs, but not in the most useful positions. The final mantle is particularly spicy for the follower, because you are facing a ~4m pendulum to the belay.
 |
| Dave in the crux of pitch 4 (6c+), just where I took that nasty whipper during the first attempt two months ago. |
L5 6c+ (not free)
The quarz band looks just as beautiful as it looks intimidating...the tiny increase in structure is pretty much compensated by increased steepness. For once, it would have paid to bring more precise shoes for better edging. There are two distinct cruxes. The first is encountered at bolt #2, the second one follows later at bolt #7. Both are super technical/sequency, but also require some amount of tension, crimping, and leg power. We tried both cruxes several times, but to no success. Felt much harder than the first 7a pitch. At least, the juggy-compact second half of this pitch offers plenty consolation for the hard time earlier.
 |
| Looking back at the monster pitch 5 (6c+). The nice second half makes up for two hard cruxes. |
L6 6b (onsight)
After a short traverse to the right, this pitch leads through more structured terrain, but one or two slabby sections require more attention to keep a clean score. Also be careful about taking the easiest path, which is not always "straight-forward"...
 |
| Viktor following in pitch 6 (6b), for once slightly more moderate terrain. |
L7 5a (onsight)
Even though quarz knobs make for great structure, I am not a great fan of their low friction. Anyways, in this case their rich presence grants easy progression. The bolts lead across a pretty delicate slab traverse (underclings!), which is everything but 5a-trivial. Moreover, should you really slip, you would most likely end up on the grassy ledge below. Probably not dangerous, but certainly unpleasant. Maybe the original line did actually take the grassy ledge, because that was the only way that looked 5a-ish.
 |
| The ominous 5a traverse in pitch 7...maybe if you utilize the grass ledge below. |
L8 7a (not free)
Finally, some biceps action: the start of this pitch features the first athletic moves on the route. During the first half, up to the small lip, the holds are always pretty decent, and even establishing yourself in a remarkable gneiss-pocket is not too hard. But just in the moment, when you start to think "Oh that was easy" you get to see the upper crux section...which is, of course, a slab! Even though there is a perfectly cut 5mm-crimp-edge, I only managed to stand up on the smears with noticeable rope pull from above...maybe this move is slightly easier for shorter people, as they don't get as boxed, but it is for sure pretty difficult!
 |
| Athletic start of pitch 8 (7a), the slab-crux follows after the thin lip in the upper section. |
L9 6c (onsight)
A short, bouldery pitch. The first two bolts follow a seam, which climbs easier than it looks. After a footswitch on the last okay smear in the face, the crux consists of a dyno to a good hold. What an awesome move, so cool! The corner to the right is a piece of cake, thanks to a generous crack, which allows for solid, but a bit painful foot jams.
 |
| Getting into position for the crux-dyno in pitch 9 (6c). What a move! |
L10 6c (onsight)
Gorgeous stemming corner! The face to the left is very smooth, and in fact, it is easier to establish yourself in the corner by first climbing the arete to the right. After a short, but challenging stemming section, a delicate slab (crux) leads you to the left, where you climb a short & juggy overhang.
 |
| Stemming corner in pitch 10 (6c). Dave just reached the jug, but it is still a long, slabby way to the belay in the top left corner of the picture. |
L11 7a (hangdogging)
Now it gets really steep (relatively speaking)! Two moderate steps, and an easy runout lead to the steep face, which is richly structured with juggy edges, and cracks. The first clips are gained relatively easily, and there is even a decent no-hand-kneebar rest (left knee) before the beefy roof-like crux. Once the bouldery roof is overcome, a balancy intermezzo follows with a funky release-sidepull-and-drop-into-shoulder-press move. The last steep section to the belay offers decent, but pumpy edges, so that the final mantle to the belay could become a potential heart-breaker. Nevertheless, Dave managed to flash this pitch, awesome! On a different note, the view from here, down on the slabs, and the entire gorge is amazing! ps: Both bolt nuts were loose...if you can, bring a small wrench to tighten them.
 |
| Solid no-hand knee-bar before the roof-crux of pitch 11 (7a). |
L12 6c (onsight)
Back to slabby terrain! The rock texture on the first couple of meters is more reminiscent of granite than gneiss, but offers a few sneaky holds to move on. Compared to the other 6c slab pitches, this pitch felt quite secure. The second half has quite rich structure, in particular several perfect edges which make for very enjoyable climbing!
 |
| Granite-like texture during the slabby start of pitch 12 (6c). |
L13 3 p.a. (not free)
The french-free pitch requires 3-4 points of aid right at the start to overcome a severely overhanging, and pretty blank section. Afterwards, it follows a very logical line along a corner, which presents a few tricky stemming, and crack moves. Intuitively, you would keep going to the right, but instead, the bolts take a sharp turn to the left, around the arete. This part is pretty difficult, first to get onto the arete, using sidepulls and a big, but high undercling (mind your rope - cutting edge!), and second to traverse/downclimb the last two meters to the belay. This latter part seemed utterly difficult, but is easily skipped when on lead. For the follower, free-climbing is more complicated, because if unsuccessful, you will swing/slam right into the belay.
 |
| Dave coming around the corner at the end of pitch 13 (6c+?). Don't party too early, the last few meters are certainly the free-climbing crux of this pitch! |
L14 6a (onsight)
At first, it is not quite easy to discover the bolts, or to determine the intended line. But once you climb, it falls into place quite naturally. From first to second bolt, the easiest way is to take a pronounced loop to the left. After climbing around the arete, you enter the home straight slab, which is not entirely trivial for the grade. A lot of lichens grow here, but most of the time, they are of little concern. The final belay is pretty uncomfortable, but you could top out to find slightly more space.
 |
| Dave going around the corner in the final pitch 14 (6a). The easiest line takes a left at the first bolt instead of going straight in the vegetated corner. |
We choose to abseil right away, which takes six swift manoeuvres with 60m half-ropes (14 - 11 - 8 - 6 - 4 - 2). The belays are equipped with a mix of small maillons and wire slings, which are ok, but a bit tedious to pull the ropes from. Moreover, several of the small maillons are pretty rusty, and should be replaced.
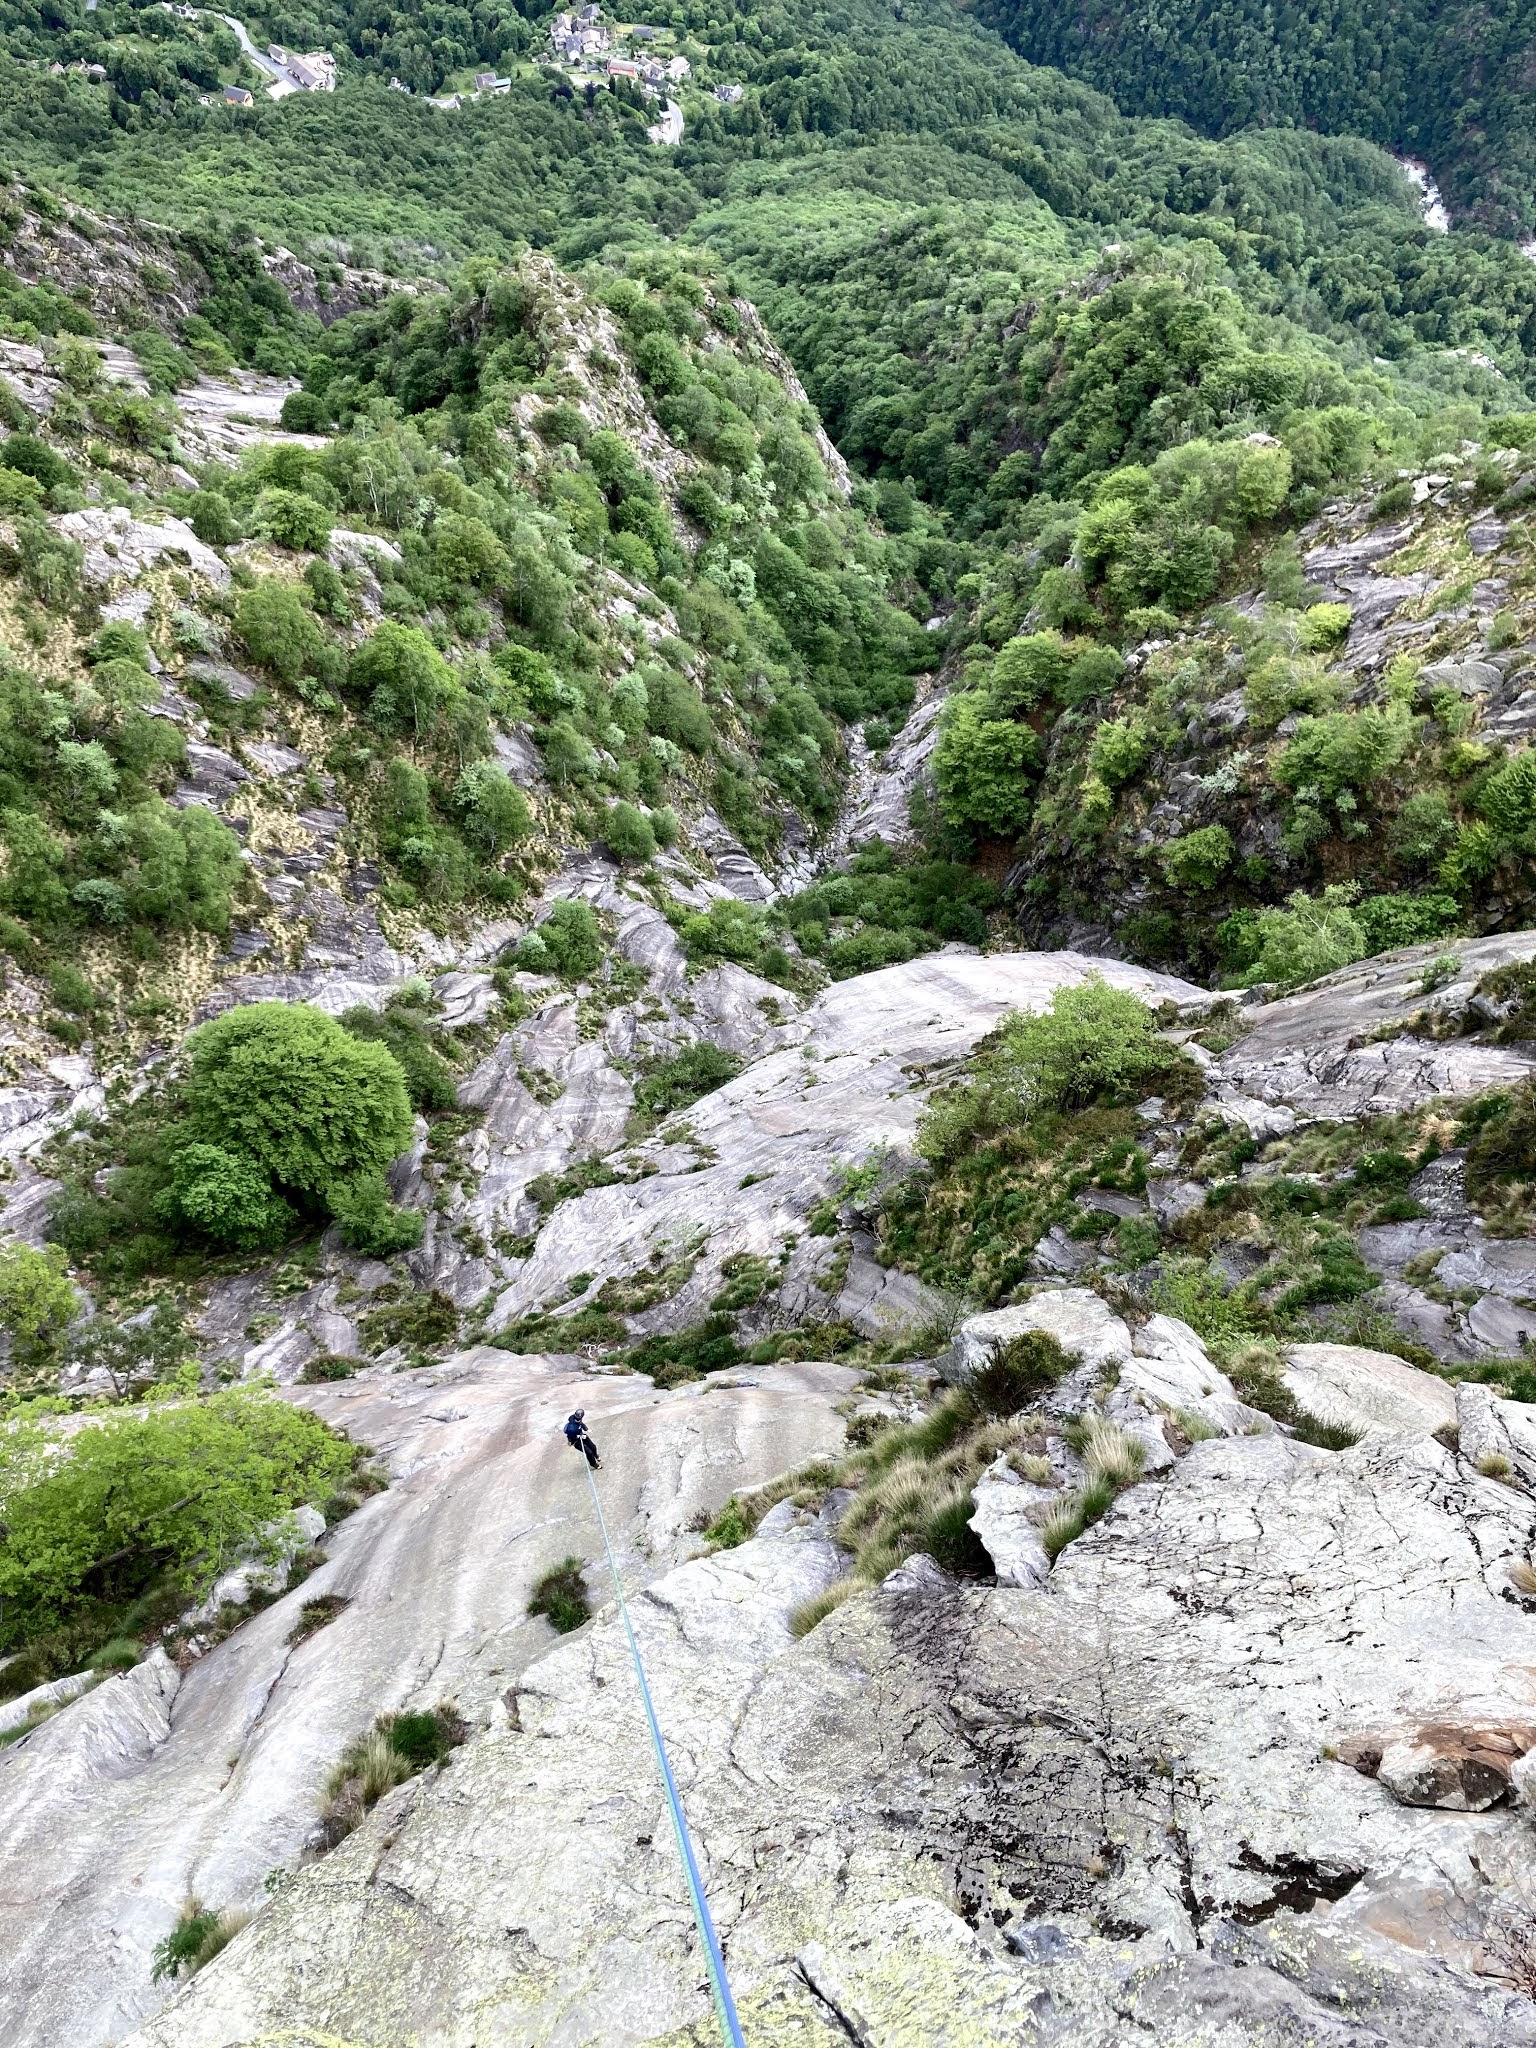 |
| The view from the upper pitches has great depth...shot taken at the belay after the athletic pitch 11 (7a). The route starts at the base of the prominent white dome, pretty much in the center of the picture. |
During the hike down, we repeatedly praised our early start, as in the meantime it had started to rain increasingly...first thing back at the car, we opened a glorious can of "Radler", and dove into one of the local fountains. The weather had been (too) sunny, and even though we had brought about two liters of water each, we were pretty thirsty in the end - the sustained, and demanding climbing had certainly added to the sweat!
Even though she is not an easy girl, and does require lots of persuasion, Lady of Dream has left us with great memories! The short aid section in pitch 13 is rather a token of her wild character, than a significant flaw. While the difficulties are high (for our standards), and mainly technical, the protection will not cause you nightmares, as it is really good, and well placed (no real need for cams). That said, an awkward fall in the wrong place can still be serious...
 |
| Cheers! Nothing tastes sweeter than the first sip after a great day out! |


Kommentare
Kommentar veröffentlichen